Pages

Showing posts with label blog hack. Show all posts

How to add HTML codes in Blogger Posts?

Recently, one my blog readers wanted to know how do I add Java scripts and other HTML codes in my blog posts. To be very frank, even I had this question when I started my blog initially. And when I tried to implement such tricks in my blog, I faced a lot of difficulties with the coding. But nowadays, I find many sites have come up with blogging tips and it has become very simple to customize your blog. Let me straight away tell you, how to implement this trick on your blog posts.

If you just want to show up HTML codes in your blogger post, that is without any customization, then use this site : Simple Code. This method will show the HTML as it is and looks very simple. If you want to customize the way it is displayed, like I do in my blog, then you should follow the next method. In this method, you will have to include some codings and then your job will be done.

Follow these simple steps to include the HTML/Java script codes in your blog post:
1. Navigate to "Layout>>Edit HTML" from your dashboard. Make a back up of your template before you do any changes in the template.
2. Now, do a search using "CTRL+F" for the following line: ]]>
(Note: I have used the first method here. Just to show you how it looks)
3. Once you find the code, paste the following piece of code above it:
.codeview {
margin : 15px 35px 15px 15px;
padding : 10px;
clear : both;
list-style-type : none;
background : #f9f9f9 url(http://img17.imageshack.us/img17/5162/codeview.gif) no-repeat right bottom;
border-top : 1px solid #eeeeee;
border-right : 2px solid #cccccc;
border-bottom : 2px solid #cccccc;
border-left : 1px solid #eeeeee;
}
.codeview li {
font-size : 13px;
line-height : 24px;
font-family : "Courier New", "MS Sans Serif", sans-serif, serif;
color : #FFFFFF;
font-weight : normal;
margin : 0;
padding : 0;
}
4. Once you do this step, save your template and return to your blog post where you want to insert the HTML code. Place the HTML content in between the following two tags namely, <div class="codeview"> and </div>.
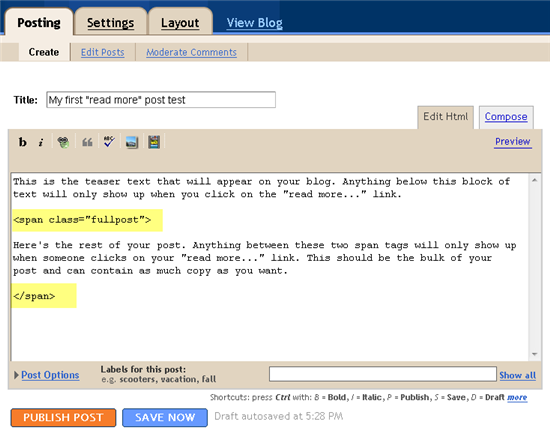
5. You can include the code straight away in the "Compose Mode" of your blog post area. After you complete your post, you can simply click the button "PUBLISH POST" and later, view the result.

How to Show Blogger Links,Widgets in HomePage Only or Post Page Only

This post explains how to show the Blogger widgets( like links,adsense ads,etc) on your blogspot blog Homepage Only or Post Page Only:

Usually, by default.. when we add a widget item like link units, profile, Archives, Adsense ads,Pictures,etc in Blogger blog , it will be displayed in every page of the blog including the homepage, Permalink pages,etc. As you can see, I installed many widgets in this blog in sidebars like Google ads, Donate Me button ,etc which will be displayed in all the pages of the blog.
But, what if you want to display a specific widget like a blog link,ads in only the homepage and not in the post pages and viceversa? If you want to do so, this tip will come in handy...

HOMEPAGE Only widgets,links in Blogger:

→ As usual, if you want to add a new widget/gadget to your blog, just Sign into Blogger dashboard » Layout » Add a Gadget
and select the type of gadget you need and Save the Changes.

Next, we have to add a small piece of code to that widget, so.. it only displays in the Homepage. Just go to Edit html and tick on the 'Expand Widget Templates'.
Notes: Normally, the widgets in the template view starts with this one

<b:widget id=


For example, The label widget looks something like this:

<b:widget id='Label1' locked='false' title='Title' type='Label'>

and html widget looks like:

<b:widget id='HTML1' locked='false' title='' type='HTML'>

and link list looks like this:


<b:widget id='LinkList2' locked='false' title='Title' type='LinkList'>

(If you want to know exactly what the widget id you need to change, just go to your blog and view the source code and find it.
In Firefox : View » Page Source
In IE : View » Source )

Just below that widget id link, You can see a b:includable tag like this..


<b:includable id='main'>

At this point, most of the task is completed.. Just we have to add a small piece of code below that b:includable tag..

the code is

<b:if cond='data:blog.url == data:blog.homepageUrl'>

and the last thing is, we have to close that b:if tag. Just add this code before the closing tag of b:includable.
Like this:

</b:if>
</b:includable>

So, the final code looks similar like the below screenshot:


Finally it looks something like this
That's it! and Don't forget to Save the Changes.
Now, your desired widget/gadget can only be visible in Homepage.

Showing in only Post Pages (Permalink pages):

This will allow you to show a specific widget in only the Post Pages and not in the Homepage.
Just follow the same tutorial above but replace this code.

<b:if cond='data:blog.url == data:blog.homepageUrl'>

with this one:


<b:if cond='data:blog.pageType == "item"'>


Showing Widgets on a Specific Blog Post url:

If you want to dispaly a specific widget on on a particular blog post, just simply follow the above tutorial, but replace this code:


<b:if cond='data:blog.url == data:blog.homepageUrl'>

with this one:


<b:if cond='data:blog.url == "Blog Post URL"'>


That's it!
Like this post or have any questions? Comment here..

Speed Up Your Blogger Page Load Time – Compress Your CSS

You have to admit, most free 3rd party Blogger templates that you download are a mess. You open up the xml file and it’s a long and ugly-looking beast of code spaghetti. If you’re like me, you prefer a nice and neat template (even though you’ll be the only one seeing it) and you’ll want to tidy it up.

Most of the code you don’t want to tinker with but the .css code (the part that styles your entire blog with images and colors) is where some people like to change font colors, sizes, or even just space it out properly so it’s important that it’s not only neatly organized, but also properly aligned.

More importantly, did you know the more lines of code your template has, the longer it takes to load in a browser? So your 1,500 lines of code in your newest Blogger template could really be much shorter in size, thus speeding up page load times for your visitors. The slower your site, the more likely a visitor will be deterred and not wait for it to load up.

So here’s a neat trick to optimize your template. I’ve started doing it with some of the newer templates now being hosted on eBlog Templates. You’ll want to do what’s called “commpress your css” into a much smaller format. There’s a site I use called CSSDrive that offers a free web-based CSS Compressor.All you do is select a few basic options like compression mode and comments handling and then paste in your css. The css is the code between the <b:skin> and </b:skin> tags.

Make sure you backup your template code before doing this! Some people might not like how the css looks after it’s compressed so it’s best to have a backup. You also might make a mistake and copy the wrong sections which could screw up your template code. Bottom-line, backup your template before doing this.

css-compression-options.png

After you click on the “Compress-it!” button it will go through your .css code and shrinks it down. Essentially it removes unnecessary white spaces and better organizes each css element into one line. Here are the results for one of the Blogger templates I compressed.

css-compression.jpg

My xml Blogger template was originally 1,286 lines of code and after the css compression was done, it dropped it down to 914. Now that’s not a huge difference (14%) and you probably won’t notice a difference when you load up your blog with the new code, but every little bit helps. Also, some template code might be messier than others so the size decrease could potentially be a lot more.

I also just ran the normal compression mode and wanted to keep my comments so if you go with the super compact mode and strip out all comments, you can compress it even further.

This tool can be used for WordPress blogs or any other websites actually. Most of the Blogger templates I come across are the ones in need of a code clean up, however. So if you’re ready to give CSS Compression a shot, check out CSS Drive’s free tool and compress away!

How to Install Google Analytics on Blogger

Wouldn’t it be nice to know how many people actually visited your blog each day? How about knowing which of your posts are the most popular? Well surprisingly Blogger doesn’t currently offer any native blog analytics but fortunately there is Google Analytics — available for free.

Google Analytics is a great tool that will show you all sorts of useful information about how people found your blog, keywords they searched on to find you, where they came from and even how long they stayed. You’ll learn more about where your visitors come from and how they interact with your blog. This is a must tool if you are trying to build a profitable blog otherwise you are flying blind!

This article will show you how to add Google Analytics to your Blogger blog. It’s a fairly simple process and doesn’t require any technical skill at all.

Step #1 – Setup a Google Analytics Account

Go to Google Analytics and sign in using your Blogger login. If your account doesn’t work for some reason, you can create a new one instead. Once you login you’ll see a screen that looks like this:

Google Analytics Blogger Sign Up Step 1

Click on the “Sign Up >>” button and proceed to the next step which will ask you for your general information. Website URL, Account Name, Country, and Time Zone. The screen will look like this:

Google Analytics Blogger Step 2

If you noticed, I just put my Blogger url (without the http://) and called it “David’s Account” because this is your top-level container for 1 or 100 different websites so it’s a good idea to name it something more general. The next step will ask you for your contact information which includes your first name, last name, phone number, and country. Easy so far right? :-)

Google Analytics Blogger Step 3

Your last step in signing up will ask you to accept the user agreement terms and conditions which you should read (just kidding…who actually ever reads these entire legal terms anyhow?).

Google Analytics Blogger Step 4

Now this next screen is very important. This is the code you will need to copy and paste into your blogger template. Go ahead and click into the box and it will automatically highlight the entire block of code for you. Now you need to copy that code and paste it into notepad or into a MS Word document. Save it as you’ll need to use it later.

Google Analytics Blogger Step 5

After you click on the “continue >>” button you will be taken to your brand new Google Analytics dashboard! You will see your blogger blog listed but with no analytical data….yet.

Google Analytics Blogger Dashboard

Ok, now you are done with setting up your Google Analytics account. The next step is placing the tracking code into your Blogger template so it can report back to Google Analytics and provide you with some cool data points.

Step #2 – Adding GA Tracking Code to Your Blogger Template

This is not a very difficult step even if you are afraid to touch your template code. Login to your Blogger account and then click on the “Layout” => “Edit HTML” tabs. This will bring you to the template code. Before you make any changes, I advice you to back up your template just in case there are any problems. After you’ve done so, continue reading.

Now in the edit template html code window, scroll all the way to the bottom of your template code and look for the </body> tag. There should only be one of these closing tags in your template. If you can’t find it then your template wasn’t properly created and you should add one right above the </html> tag.The </html> tag should always be your last line of code in your template. It signifies the end of your template.

Ok, now go back to the code you saved before in a Word Doc from Google Analytics. You are going to copy it and paste it right above the </body> tag as illustrated in the image below. The yellow highlighted code is the new GA code I just pasted into my template.

blogger google analytics code 2

Save your template and you shouldn’t get any error messages. If you do, it’s most likely not related to this GA code and something else with your template itself. Assuming you’ve been successful with your save, you are all done embedding the GA code in your template!

Step #3 – Confirm Google Analytics is Tracking

Go back into your Google Analytics account and look at your dashboard. Most likely you will see a little yellow exclamation mark under the “status” column that looks like this: google analytics tracking not installed. This means everything isn’t working properly yet which is fine because we are about to tell GA we just added the code. From your dashboard, click on the “edit” link which is located to the far right.

Google Analytics Blogger Dashboard Edit

After you click on that link, you’ll see another screen like below. It will say “Tracking Not Installed” followed by a link “Check Status”. You’ll want to go ahead and click on that link which will tell GA to visit your site and look for the new code you just pasted in your template.

Google Analytics Blogger Dashboard Check Code

Assuming you pasted the code in there as instructed above, GA will find the new code and begin tracking everything on your blog. If you are still having problems, it’s most likely something to do with GA and you should read their help guide to troubleshoot your problem.

Google Analytics Blogger Dashboard Success

The message seen here, “Waiting for Data” means you have correctly setup GA and data is being gathered! Click on the top left Google Analytics logo and it will take you back to your dashboard. From there click on the “View report” link and that’s where all your very important Blogger visitor data will start appearing!

Google Analytics Blogger Dashboard Results

Now it usually takes an hour or so before you will see any data (maybe longer if you don’t get much traffic to your blog) so please be patient. Trust me, you’ll be logging in at least once a day just to see how much traffic your blog is getting. It’s very addicting and powerful information to learn from. You’ll be surprised which posts are your most popular and what countries people are coming from to read your blog.

Google Analytics is very powerful and we have just learned how to install it into your Blogger template. We haven’t even scratched the surface on the features and reporting it can do. For most Bloggers, this will be enough. Data will be collected and you will just review it. Others with more in-depth goals (like selling products or services, creating a sales funnel, etc) will want to spend more time learning GA. Hope you enjoyed the tutorial and don’t blame me for your new found addiction!

Add Page Element Under Header Section in Blogger

Learn in few easy steps how to insert Page Elements under header section in blogger.

1. Login to your blogger account.
2. Go to LAYOUT tab.
3. Click edit HTML.
4. Click on Download full template FIRST!!.(for your backup)
5. Now we are going to make a new column under your header.
6. Hold Ctrl key and press F. Then, find this word : ]]></b:skin>
7. Copy the code below and paste it before this code : ]]></b:skin>


#under_header{
margin:10px 0;
padding:1%;
width:98%;
}


8. Then, find the code which look exactly like this :

<div id='header-wrapper'>
<b:section class='header' id='header' maxwidget="1" showaddelement="no">
<b:widget id='Header1' locked='true' title='test (Header)' type='Header'/>
</b:section>
</div>


9. Copy the code below and paste it exactly after that code.

<div id="under_header">
<b:section class='header' id='underheader' preferred='yes'/>
</div>


10. Click Save Template button and wait until template saved.
11. Now you've DONE your work.
12. Click page element and you can see a new element under header.

Embed a Comment Box in Blogger Post

earn How to Insert Comment Box on Every Blogger Post like wordpress ? It's very simple to learn and implement to make your user more friendly with comments for your post.


Go to Layout -> Edit HTML and mark the box Expand Widget Templates. Look for this piece of code:

<p class='comment-footer'>
<a expr:href='data:post.addCommentUrl' expr:onclick='data:post.addCommentOnclick'>
<data:postCommentMsg/></a>
</p>
</b:if>

Then Replace the Existing Code with This Code

<p class='comment-footer'>
<b:if cond='data:post.embedCommentForm'>
<b:include data='post' name='comment-form'/>
<b:else/>
<b:if cond='data:post.allowComments'>
<a expr:href='data:post.addCommentUrl' expr:onclick='data:post.addCommentOnclick'>
<data:postCommentMsg/></a>
</b:if>
</b:if>
</p>
</b:if>

Hack To Share Your Adsense Revenue With Different Authors Of Your Blog

You would be knowing for sure as now all the big bloggers with many writers use adsense revenue sharing hack for blogs.What actually it is about?.As many still would be not knowing about it,Like suppose i own a blog and run it.Now there are also,3 more authors to my blog who also write for my blog.Now the blog is owned by me but it have 4 authors including me who are very active on my blog to post and i have been using adsense adds at the beginning and end of the post to make some money out of it.

Now problem comes here,as how to distribute or share the revenue with other authors of my blog to give there share,as it becomes difficult to check how much the authors post is contributing to revenue of blog.So the thing only can be done is to show the adds of the that author google adsense account on posts done by him/her.As this will give him the exact revenue he deserves for doing that post.

I hope now you would be clear what i was talking about.Now this hack is very simple in wordpress blogs as plugin is available for it.Now i would like to tell you how make this work in bloggers.If you really have many authors to your blog-you can really use this hack to attract more authors and give them the reason to work hard for posting on your blog,which would give them the real revenue they deserve for that post.

As the best part is,if the author had previous posts on your blog,the adds will appear on that posts too automatically.Now how to implement it in blogger.


1. Login to Blogger dashboard
2. Navigate to Layout >> Edit HTML and Expand Widget templates
3. Search for the following code inside your template

&lt;data:post.body/&gt;

4. Insert the following piece of code just above or below the red code you find.As adding above will show adds at beginning of post and below will result in at end of post.Or add at top and bottom both,to show at both places.


&lt;b:if cond='data:blog.pageType == "item"'&gt;

&lt;b:if cond='data:post.author == "admin"'&gt;
Insert Ad Code for admin here (first author)
&lt;/b:if&gt;

&lt;b:if cond='data:post.author == "anshul"'&gt;
Insert Ad Code for anshul here (second author)
&lt;/b:if&gt;

&lt;b:if cond='data:post.author == "sunil"'&gt;
Insert Ad Code for sunil here (third author)
&lt;/b:if&gt;

&lt;/b:if&gt;


5. Replace the author name and ad code with the actual ones.As names are in bold and replace whole line 'Insert Ad Code for admin here (first author)' with the add codes of that author.

Its not necessary to use only adsense codes there.The author can have any banner add also like of his affiliate program he wants.Its upon the author with what add he wants to display.

Like above i have made 3 authors- admin,anshul and sunil.You can make any number you like,just keep on adding codes as i have done.Just change them with the name of yours,you are using in blogger as display name i.e post author name.Remember all the author names should be different.

6. Save the changes you have made.
7. You are done.
8.Verify that correct ads are shown by viewing HTML source code of the web pages when visiting posts created by various authors or bloggers.

I hope it will be very helpful for some bloggers who have many authors to there blog and even give you now opportunity to invite other authors to your blog.

Add The Blogger “Read More” Expandable Posts Link

This is a pretty popular Blogger hack that lots of people have asked me about. Instead of answering to each email individually, I thought it would make more sense to write an article about it.
http://allblogtools.com/imgup/9-2009/blogger-read-more-L.jpg
With this hack, you can choose to display a select amount of text from the beginning of each post as a teaser instead of showing the entire post on the front page of your blog. Then when people want to read the rest of the post, they can click a “read more” link to see the full post. This is very handy if you have lots of long articles all on one page. (Note that you’ll need to have post pages enabled in order to make this feature work.)
Step #1 – Update Your Template Code

First you need to edit your existing code so I recommend copying and pasting it into notepad or any text editor. Also, it’s smart at this point to create a backup of your template just in case something goes wrong. Now do a search (CTRL + F) within the text editor for the following code post-header-line-1. This is the default code that Blogger includes but some custom templates remove or change this code so you might have trouble finding it. If you can’t locate this text then try searching for <data:post.body/> instead. Your template will for sure have this since it’s the tag that actually prints the body of your post.

Now depending on which code you were able to find will determine how easy the next steps will be. You might need to do some detective work first in order to get this working properly in your custom template. The idea is to get this new code into your template before the <data:post.body/> tag. Keep reading and hopefully the explanation will illustrate the concept clear enough so you are able to adapt this hack to your custom template.

Add the following code below the <div class=’post-header-line-1&#8242;/> and <div class=’post-header-line’> tags if you’ve got both.

<b:if cond='data:blog.pageType == "item"'>
<style>.fullpost{display:inline;}</style>
<p><data:post.body/></p>
<b:else/>
<style>.fullpost{display:none;}</style>

The result should look something like this:

new-code-block.png

If you don’t have the default <div class='post-header-line-1'/> tag then your result should look something like this instead. This is how it would be done in the MushBlue Blogger custom template:

new-code-block-mush.png

Notice in both examples that the code in yellow and the <data:post.body/> tags are the same — it’s just tag above it that will differ based on the template you’re using.

Now let’s add one more bit of code which will actually create the “read more” link in your post. This code will go below the <data:post.body/> tag so copy the following and paste it in. Feel free to change the “Read more…” text to whatever you want the link to look like. Be careful not to delete any other code during this process.

<b:if cond='data:blog.pageType != "item"'><br />
<a expr:href='data:post.url'>Read more...</a>
</b:if>
</b:if>

Yes, there are supposed to be two </b:if> tags in the above code so don’t think it’ s a mistake. The result should look like this:

new-code-block-2.png

new-code-block-3.png

Ok, you’re all done editing the template code. Paste it back into your Blogger html window and save it. If you get an error, you made a mistake. The most common mistake is to accidentally delete a > or <>

Step #2 – Add a Class Tag in Your Default Post Template

For this step, you need to navigate in your Blogger account to “Settings” => “Formatting” and scroll all the way down to the bottom. It’s the last option called “Post Template”. You’re going to paste in the following code:

<span class="fullpost">

</span>

You’ll want to keep the spaces in there which will make sense later. After you save this, it will look like this:

Step #3 – Create a New Post

Ok, we’ve got everything all setup so it’s time to go and test it out. Hopefully you’ve got a new post in mind for your blog. If not, then we’ll just create a test post which you can later delete. When you click on the “Posting” tab, you’ll notice that the post text area is now pre-populated with the <span class=”fullpost”> and </span> tags. If not, then you didn’t save it properly so go back and re-read step #2.

So when writing your new post, anything you put above the <span class=”fullpost”> tag will be the teaser text. The main body of your post needs to go in between the <span class=”fullpost”> and </span> tags in order for the “read more…” link to work properly. See the screenshot below. Sometimes pictures illustrate better than words.

post-template-result2.png

Now publish or preview your post to see the “read more” hack working on your blog. If it doesn’t show up for some reason, go back and run through the steps again. Most likely you pasted the code blocks in the wrong places. It’s difficult to troubleshoot these issues since each template can be unique so please make sure to double-check your template before asking for help in the comments section below.

Here’s the live post with the “read more…” link properly working based on the text I used above in the post text area.

post-results.png

Additional Info

If you want to go back and update your old posts with this new “read more…” feature you can. Just go back and edit each post manually. Essentially you’ll need to paste in the <span class=”fullpost”> and </span> tags breaking apart the post into two parts.

For some posts, you might not want to use this feature at all. If that’s the case, just delete the <span class=”fullpost”> and </span> tags from within your new post text area. Then your new post will show up entirely just like it used to before you implemented this hack. Enjoy!


Removing The Blogger Bar

I hated the blogger bar across the top of my Web site because it didn’t really go with my template and I already had a Google search bar integrated. So I went on a mission to remove it and de-bloggerify my blog. I searched far and wide and for some reason kept hitting a dead end. It turns out that the code used to change the old blogger templates no longer works! So after tracking down the CSS changes here is how I did it:

Blogger Tips - Removing The Blogger Bar

Blogger Tips - Removing The Blogger Bar


All you need to do is add the following CSS to your template under edit HTML. You need to put in anywhere in your template between the <style> tags.

#navbar-iframe { height:0px; visibility:hidden; display:none; } tags.

    #navbar-iframe { height:0px; visibility:hidden; display:none; }

How to Show Related Posts with Thumbnails on Blogger?

Want to show related posts on your Blogger-powered blogs? What about related posts with thumbnails? Yes, you can display links to related posts with thumbnails at the end of every blog post on your Blogger blog. Thanks to a new Blogger template hack by Blogger Plugins. All you need to do is modify your existing template by adding some extra lines of codes. Don’t worry, you can do it even without any prior knowledge of CSS or HTML. Just follow the steps below.

Blogger Related Posts with Thumbnails

Guide to show Related Posts with Thumbnails on Blogger blogs:

Sponsored by PTCSA DIGITAL NEWS, Sarkari Naukri-Current Vacancy.